So glad I took some of the wood with me, the top and bottom. (AA Sitka Spruce Top Board, Tasmanian Blackwood bottom and sides).
Tonight I joined the top and bottoms together and cut out the back braces. Here’s a summary of what I did:
Making the top and bottom
- Michael helped identify the mirror edge of the bottom halves. He lay them on top of each other and looked at the end grain to see that it matched (halves are sawn from the same cross cut piece of timber).
- Identify and mark the top side of both halves.
- Long plane both top and bottom halves along the join edge. Use a block to hold the wood (MDF with a retaining strip attached to it to prevent movement)
- The two boards should make and crisp, snapping noise when brought together like a set of film clappers.
- Look at the boards up at the light to see that there is no gap.
- Check that they don’t pivot, laying them on the table.
- Press them together at one end and make sure they don’t spread at the other.
- Plane is working well when get a shaving that is the length of the board
- Next the boards need to be joined and glued:
- Special ‘jig’ to bring them together. MDF base with one side fixed to it at 90 degrees. The other slides in and out and has 3 wing nuts attached to it that go through the slots in the adjustable piece.
- Place the right width strip of timber down the centre of the tool and place both matching halves in the jig and tighten the wing nuts
- Remove the timber centre strip and push the sides down flat. They should pop back up when you remove the pressure
- Place a piece of timber the length of the centreline on top and check that a couple of g clamps are adjusted correctly to hold it down when you are ready.
- Remove the boards and place a strip of paper down the centre to catch any glue.
- Run glue down the sides of the boards to be joined. Use finger as a guide to catch any glue and to make it easy to support it.
- Place them back in the jig in the correct alignment and press down.
- Put another piece of paper over the join then put the centre timber over the join and clamp down with g clamps at either end.
- Glue takes an hour and a half to dry
- Repeat for the top
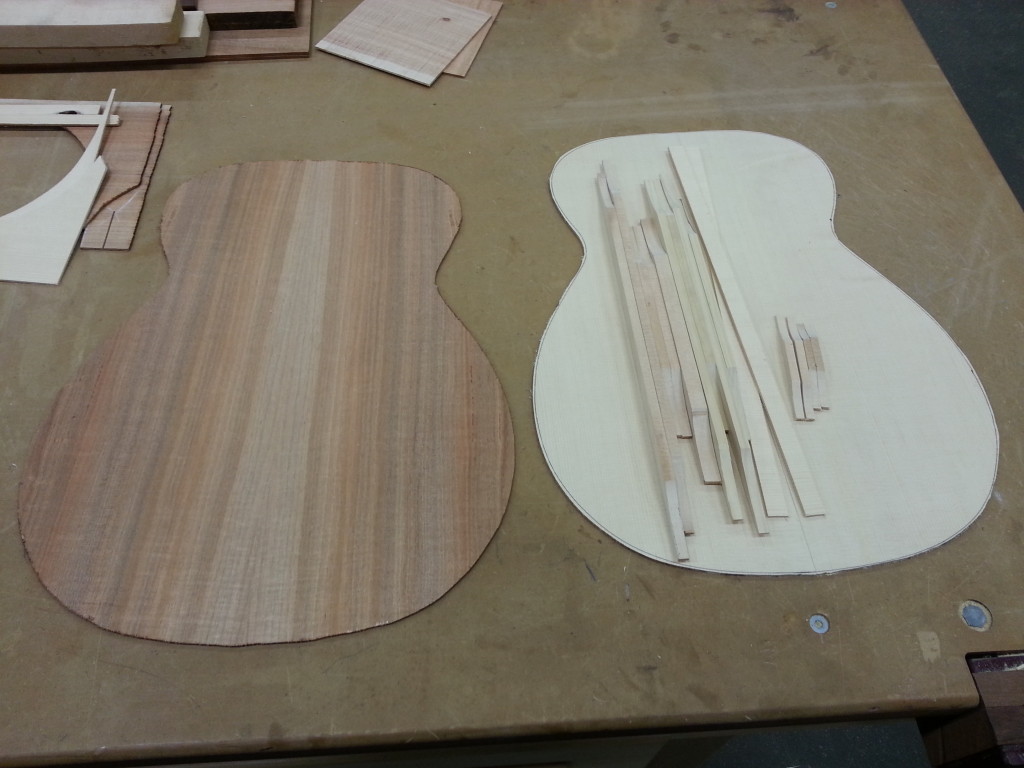
Making Back Braces
- Cut the braces to the correct lengths
- On the 12′ diameter sanding block.
- Place each brace in the centre.
- Set a pen/pencil at the height in the centre then carefully draw out to both edges to get a curve matching the sanding block
- Do that for all 4 braces
- Cut the curve with the bandsaw near the marked lines then sand down with the belt sander to the line.
- Then sand along the length of the brace till the curve matches the block curve
Cutting out the bottom
- With the template (the pattern glued to a piece of Perspex), draw around the template in pen
- Leave a 2-3mm gap between the edge of the template and the line
- Cut down the centre line to the top and bottom edges of the guitar shape
- Then cut along the worst end of the board to the centre line and continue round the guitar. Take your time.
- Putting a piece of MDF that is cut into a slot in the saw helps prevent chip out of the board